Using Elsa Workflow Dashboard in Angular App

Last month, I’ve discovered a really good open-source project that allow to create Workflow using DotNet Core Language named Elsa . One of the famous element of this library is also that it propose a Dashboard to create the workflow definition and manage the Workflow Process instance.

The UI Designer is developed using StencilJS that allow to create Web Component. Web Component can then be used in various framework integration like Angular, React, Vue, Ember etc…

We will see in this blog how to integrate the Dashboard in an Angular App.

Creating the Angular App

First of all, let’s create an angular App. For this, just use the Angular CLI :

ng new AngularElsa
cd AngularElsa
ng serve

you should see your basic angular app.

Preparing the Elsa Package

In the Elsa source code, there is a powershell (.\build-assets.ps1) script that allow you to compile and create the Javascript Package. This script just execute the following command :

cd ./src/designer/elsa-workflows-studio
npm install
npm run build

cd ../bindings/aspnet/Elsa.Designer.Components.Web
npm install
npm run build

this will allow you to have a bundle of JS file that you will use in your angular app.

In the Assets folder of you angular App :

  • Copy the folder src/designer/elsa-workflows-studio/dist/elsa-workflow-studio to /assets/elsa-workflow-studio
  • Copy the folder src/designer/elsa-workflows-studio/node_modules/monaco-editor/min to /assets/Monaco-editor/min

Remove the content of the app.component.html file and replace with the following content :


<elsa-studio-root server-url="https://localhost:11000"
monaco-lib-path="/assets/monaco-editor/min">
<elsa-studio-dashboard></elsa-studio-dashboard>
</elsa-studio-root>

server-url is https://localhost:11000 because it’s the value of the endpoint exposed by Elsa.Samples.Server.Host.csproj project that allow us to have the API used by the Dashboard.

monaco-lib-path is the link to the path of the Monaco editor. If you install the Monaco-editor with npm package you will link to node_modules folder and not /assets/…

now we need to allow the use of custom element in our angular app. Indeed, you will have this error if you try to launch the app now :

‘elsa-studio-dashboard’ is not a known element:

1. If ‘elsa-studio-dashboard’ is an Angular component, then verify that it is part of this module.

2. If ‘elsa-studio-dashboard’ is a Web Component then add ‘CUSTOM_ELEMENTS_SCHEMA’ to the ‘@NgModule.schemas’ of this component to suppress this message.

So you have to add the following line to your app.module.ts :

import { CUSTOM_ELEMENTS_SCHEMA } from '@angular/core'

and , schemas: [CUSTOM_ELEMENTS_SCHEMA ] in the @NgModule like this :

@NgModule({
  declarations: [
    AppComponent
  ],
  imports: [
    BrowserModule
  ],
  providers: [],
  bootstrap: [AppComponent],  schemas: [CUSTOM_ELEMENTS_SCHEMA ]
})

The last thing is to import all the desired files in the index.html header :

Add the following lines to your index.html file.

<link rel="icon" type="image/png" sizes="32x32" href="/assets/elsa-workflows-studio/assets/images/favicon-32x32.png">
<link rel="icon" type="image/png" sizes="16x16" href="/assets/elsa-workflows-studio/assets/images/favicon-16x16.png">
<link rel="stylesheet" href="/assets/elsa-workflows-studio/assets/fonts/inter/inter.css">
<link rel="stylesheet" href="/assets/elsa-workflows-studio/elsa-workflows-studio.css">
<script src="/assets/monaco-editor/min/vs/loader.js"></script>
<script type="module" src="/assets/elsa-workflows-studio/elsa-workflows-studio.esm.js"></script>

Start the Server Host and the Dashboard

Once everything is ok, If all the components of the angular App are ok, you will see the following screen:

Now, you’ll need to start the Elsa.Samples.Server.Host.csproj project to get the api available :

Microsoft.Hosting.Lifetime: Information: Now listening on: https://localhost:11000
Microsoft.Hosting.Lifetime: Information: Application started. Press Ctrl+C to shut down.
Microsoft.Hosting.Lifetime: Information: Hosting environment: Development

Once this is done, you can navigate to the Workflow definition

And then Create Workflow :

As you can see, everything is loading correctly, if you try the WriteLine Activity with a javascript Value. The editor show that monaco-editor is also well loaded.

Next you can look at the guide at the following link ASP.NET Core Server with Elsa Dashboard + Elsa Server API Endpoints · ELSA (elsa-workflows.github.io) to start your first workflow using the designer.

Posted in Non classé | Tagged , , | Leave a comment

Azure Site Extensions : Application Request Routing


Do you know that Application Request Routing is available on Azure WebApp?

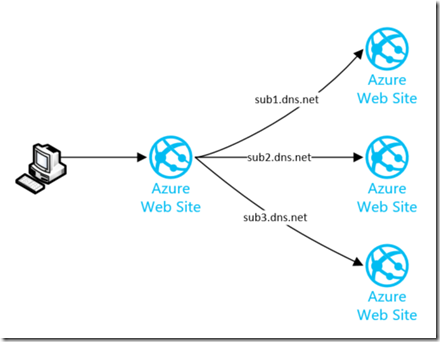
Last year, I needed something to create a simple DNS Gateway. I decided to looked at the Azure WebApp. My first choice was to create some custom API that will act as a proxy, but the performance was bad. Then I’ve seen that ARR was available on Web App and so I’ve just to configure my Web.config correctly to route request.

The aims was to realize the same thing that this old project that I currently use in production : https://sg.codeplex.com/ but host all in the Azure Web Site.


image

All the bits are available on GitHub :

https://github.com/jdevillard/AzureProxyAdminConsole

Continue reading

Posted in ASP.NEt, Azure, English | Tagged , , | 1 Comment

Use the Azure Storage library in .NetCore Application


Today, I would like to use the Microsoft Azure Storage from .NetCore Application hosted on linux. The azure storage SDK is available on Github https://github.com/Azure/azure-storage-net and the readme indicate the targeted platforms :

Netstandard1.3 (CoreCLR RTM): Storage Client Libraries for .NET are available to support CoreCLR application development.

Ok ! so a nuget should be available for my project.

I’ve created a new .Net Core App console in my Visual studio, and then try to install the nuget package (7.2.1) :

image

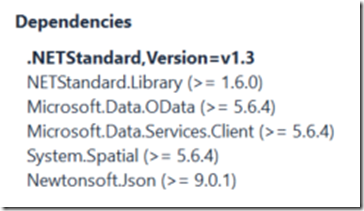
It seems that there is a .NetStandard compatible version :

image

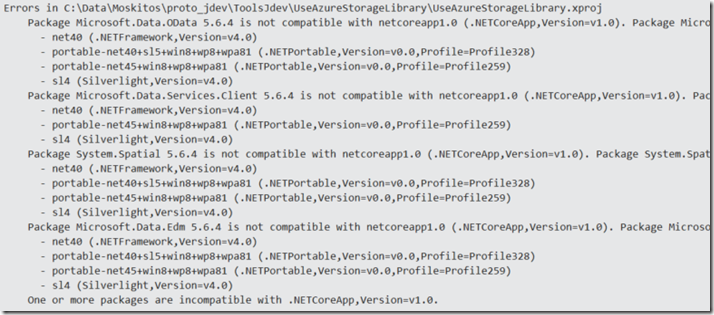
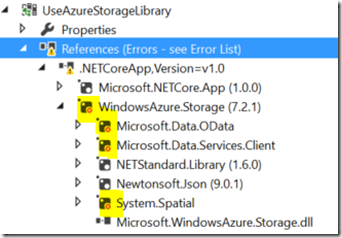
but after installing the nuget, I get the following errors :

Package XXX is not compatible with netcoreapp1.0

image

image

hum !

How to fix it? because the Github readme seems to explains that it could work on .NetCore.

I’ve done the same manipulation in a AspNet Core application and everything build successfully … Triste

I’ve looked in the project.json and I’ve seen the difference.

In the project.json of the Console App :

“frameworks”: {
   “netcoreapp1.0”: {
     “imports”: “dnxcore50”
   }
}

In the project.json of the AspNet Core App :

“frameworks”: {
   “netcoreapp1.0”: {
     “imports”: [
       “dotnet5.6”,
       “portable-net45+win8”
     ]
   }
},


Catch! 

So I’ve changed the import property to include dotnet5.6 and portable-net45+win8 and voila ! The project successfully load the nuget and compile.

After I’ve deployed the console app on a Linux and everything works fine !

HTH !

Posted in Azure, English | Tagged , | Leave a comment

Limite de quota Azure & Resource Manager

Je viens de m’apercevoir que les limites de quotas avec changé avec le ressources Manager.

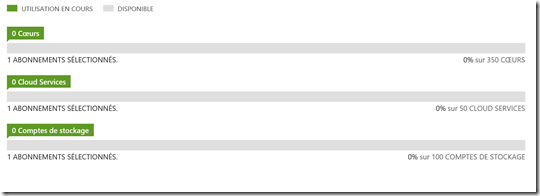
Avant en effet, les limites de quotas était disponibles au niveau de l’ancien portail (https://manage.windowsazure.com) dans la partie Paramètres –> Utilisation

image

Ici on voit clairement que j’ai de la ressource de disponibles, pourtant, lorsque j’essaie d’exécuter un template ARM va me créer un réseau de machine virtuelle, je me retrouve avec ce type d’erreur :

Resource Microsoft.Compute/virtualMachines ‘resoureName’ failed with message ‘Operation results in exceeding
quota limits of Core. Maximum allowed: 10, Current in use: 9, Additional requested: 2.’

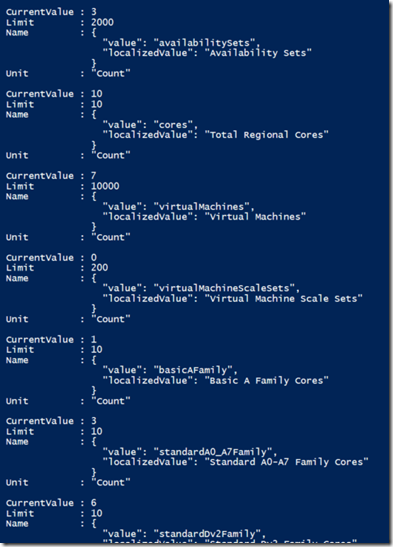
Je serais donc limiter à 10 coeurs? une petite recherche m’indique que je dois effectivement regarder mes limites de ressources avec la commande powershell suivante :

Get-AzureRmVMUsage –location “West Europe”

qui m’indique effectivement avec le retour suivant que mes quotas sont désormais limités :

  • par région
  • par type de machine virtuelle
  • etc.

image

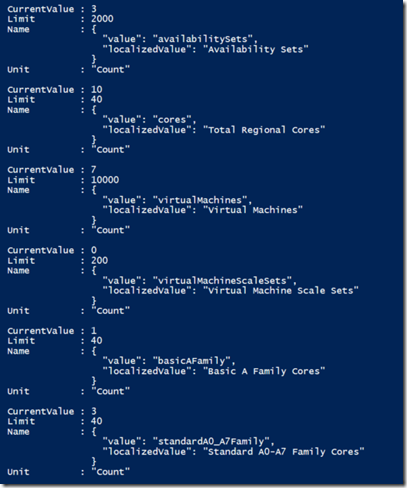
Un petit ticket de support ouvert pour augmenter mon quota et hop :

image

(PS: la demande d’augmentation de cœurs se fait en indiquant son besoin, j’ai demandé 40 cœurs par machine sur West Europe et mon ticket a été pris en compte en 10min )

voici les liens utiles :

Informations sur les erreurs communes lors des déploiements utilisant l’ARM :

https://azure.microsoft.com/fr-fr/documentation/articles/resource-manager-common-deployment-errors/

Informations sur les quotas Azure (Abonnement et Resource Manager):

https://azure.microsoft.com/fr-fr/documentation/articles/azure-subscription-service-limits/

Posted in Azure, Français | Tagged , , , | Leave a comment

Azure Billing Export – Comment recréer votre consommation Azure


Bonjour,


dans les précédents billets, nous avons vu comment utiliser les 2 APIS de billing Azure :

  • Api Billing Azure – Part 1 : Utilisation de l’API Resource Usage permettant de connaitre la consommation de service Azure en unité Azure.
  • Api Billing Azure – Part 2 : Utilisation de l’API RateCard permettant d’avoir les prix unitaires des services Azure en fonction des offres Azure.

Dans cette nouvelle partie, je vous propose de voir comment j’ai utilisé ses 2 apis pour recréer le fichier de détails de consommation que l’on peut récupérer sur son compte Azure (https://account.windowsazure.com)

Ce programme est disponible sur github à l’adresse suivante :

https://github.com/jdevillard/AzureBillingExport

Continue reading

Posted in Azure, Français, Microsoft | Tagged , , , , | Leave a comment

Utilisation de l’API Billing d’Azure – Part 2 : RateCardApi

Dans la première partie, nous nous sommes intéressé à la première API de billing de Microsoft Azure permettant de connaitre la consommation de sa souscription Azure à l’aide de l’API Usage (https://jeremiedevillard.wordpress.com/?p=1295).

Cette première API nous permet de connaitre la consommation en “unité” de service, nous devons donc rapprocher cette notion d’unité à une valeur monétaire, c’est à cette occasion qu’aujourd’hui nous allons devoir utiliser l’API RateCard.

Continue reading

Posted in Azure, Français, Windows Azure Platform | Tagged , , , | 1 Comment

Utilisation de l’API de Billing d’Azure – Part 1 : ResourceUsage

Au cours des billets suivants, je vais vous proposer de travailler sur les APIs de billings qui permettent d’avoir une vue d’ensemble de votre consommation tarifaire au niveau de votre environnement Azure.

Une introduction des possibilités est disponible à l’adresse suivante :

https://azure.microsoft.com/fr-fr/documentation/articles/billing-usage-rate-card-overview/

Il y a 2 API à connaitre :

  • Resource Usage Api qui permet de  :
    • connaitre l’utilisation des services azure (à l’heure ou au jour)
    • d’avoir les informations de métadonnées des services (Tag etc…)
  • Resource RateCard API qui permet de :
    • connaitre de connaitre les services disponibles sur l’offre azure choisit
    • connaitre l’estimation tarifaire d’une unité de service dans la devise choisi.

Ces 2 APIs sont sécurisés via le RBAC, et il est nécessaire d’avoir à minima un accès Lecteur à la souscription pour être en mesure d’utiliser ses APIs. Une application sur l’Azure Active Directory de la souscription sera alors crée pour gérer les authentifications via le framework ADAL.

Vous pouvez retrouver les exemples de code fournit par Microsoft sur ce gitHub. Ces exemples montre l’utilisation de chacune des APIs de manière indépendantes. Je vous proposerais au fur & à mesure de l’explication de faire la jonction entre les 2 APIs.

https://github.com/Azure/BillingCodeSamples

Intéressons au sample concernant l’usage : https://github.com/Azure-Samples/billing-dotnet-usage-api

Après avoir configuré votre Azure Active Directory de votre souscription pour lui rajouter une application et définir votre application native, vous pouvez ,à l’aide d’un compte ayant à minima les droits Reader sur la souscription, récupérer les informations d’usage.

Le sample propose une authentification interactive au démarrage de l’application console à l’aide d’ADAL.

Pour démarrer l’application, il vous suffit de précisé quelques éléments dans le fichier de configuration :

  • Tenant Domain
  • Subscription ID
  • Client Id

Egalement, il est nécessaire d’aller un peu dans le code afin de modifier l’appel d’Api du sample afin de configurer un intervalle de temps reflétant l’utilisation de votre souscription :

(J’ai rajouté dans le program.cs la modification de l’uri avec les dates d’intervalles voulus)

string startDate = &quot;2016-07-01&quot;;
string endDate = &quot;2016-07-31&quot;;
// Build up the HttpWebRequest
string requestURL = String.Format(&quot;{0}/{1}/{2}/{3}&quot;,
ConfigurationManager.AppSettings[&quot;ARMBillingServiceURL&quot;],
&quot;subscriptions&quot;,
ConfigurationManager.AppSettings[&quot;SubscriptionID&quot;],
&quot;providers/Microsoft.Commerce/UsageAggregates?api-version=2015-06-01-preview&amp;amp;reportedstartTime=&quot;+startDate+&quot;+00%3a00%3a00Z&amp;amp;reportedEndTime=&quot;+endDate+&quot;+00%3a00%3a00Z&quot;);
HttpWebRequest request = (HttpWebRequest)WebRequest.Create(requestURL);

on a alors un retour avec 2 types d’enregistrements :

{
&quot;id&quot;: &quot;/subscriptions/00000000-0000-0000-0000-000000000000/providers/Microsoft.Commerce/UsageAggregates/Daily_BRSDT_20160701_0000&quot;,
&quot;name&quot;: &quot;Daily_BRSDT_20160701_0000&quot;,
&quot;type&quot;: &quot;Microsoft.Commerce/UsageAggregate&quot;,
&quot;properties&quot;: {
&quot;subscriptionId&quot;: &quot;00000000-0000-0000-0000-000000000000&quot;,
&quot;usageStartTime&quot;: &quot;2016-06-30T00:00:00+00:00&quot;,
&quot;usageEndTime&quot;: &quot;2016-07-01T00:00:00+00:00&quot;,
&quot;meterName&quot;: &quot;Free App Service&quot;,
&quot;meterCategory&quot;: &quot;Azure App Service&quot;,
&quot;unit&quot;: &quot;Apps&quot;,
&quot;instanceData&quot;: &quot;{\&quot;Microsoft.Resources\&quot;:{\&quot;resourceUri\&quot;:\&quot;/subscriptions/00000000-0000-0000-0000-000000000000/resourceGroups/Default-Web-westus/providers/Microsoft.Web/sites/moskitosnugetgallery\&quot;,\&quot;location\&quot;:\&quot;westus\&quot;,\&quot;additionalInfo\&quot;:{\&quot;AppServicePlanUri\&quot;:\&quot;/subscriptions/00000000-0000-0000-0000-000000000000/resourceGroups/Default-Web-westus/providers/Microsoft.Web/serverfarms/Default0\&quot;}}}&quot;,
&quot;meterId&quot;: &quot;c0f5cb45-6fb1-41c9-8545-72ad400d9da4&quot;,
&quot;infoFields&quot;: {

},
&quot;quantity&quot;: 0.004032
}
},
{
&quot;id&quot;: &quot;/subscriptions/00000000-0000-0000-0000-000000000000/providers/Microsoft.Commerce/UsageAggregates/Daily_BRSDT_20160701_0000&quot;,
&quot;name&quot;: &quot;Daily_BRSDT_20160701_0000&quot;,
&quot;type&quot;: &quot;Microsoft.Commerce/UsageAggregate&quot;,
&quot;properties&quot;: {
&quot;subscriptionId&quot;: &quot;00000000-0000-0000-0000-000000000000&quot;,
&quot;usageStartTime&quot;: &quot;2016-06-30T00:00:00+00:00&quot;,
&quot;usageEndTime&quot;: &quot;2016-07-01T00:00:00+00:00&quot;,
&quot;meterName&quot;: &quot;Standard IO - Table/ Queue (GB)&quot;,
&quot;meterCategory&quot;: &quot;Storage&quot;,
&quot;meterSubCategory&quot;: &quot;Locally Redundant&quot;,
&quot;unit&quot;: &quot;GB&quot;,
&quot;meterId&quot;: &quot;bd69546d-19b0-4776-865f-8753b800883b&quot;,
&quot;infoFields&quot;: {
&quot;meteredRegion&quot;: &quot;West Europe&quot;,
&quot;meteredService&quot;: &quot;Storage&quot;,
&quot;meteredServiceType&quot;: &quot;&quot;,
&quot;project&quot;: &quot;storeage91284058&quot;
},
&quot;quantity&quot;: 0.000010
}
}

les enregistrement avec le champs infoField correspond à l’ancien format des objets Azure et le chamsp InstanceData correspond au nouveau format de données des resources Azure.

Tout les détails sur ses champs sont référencés sur la documentation de l’API : https://msdn.microsoft.com/en-us/library/azure/mt219001.aspx

Les champs importants à prendre en compte pour être en mesure de rapprocher l’usage à la facturation sont les champs :

  • meterId : identifiant unique du type de service
  • quantity : quantité consommé

Ces 2 champs nous serons utile par la suite pour calculer le coût de la souscription Azure à l’aide de l’API RateCard !

Posted in Non classé | 2 Comments

[Azure] : Mise à disposition du Service Bus sur le nouveau portail


Une nouvelle intéressante survenue en début de semaine, le service bus est enfin disponible dans l’interface du nouveau portail. https://blogs.msdn.microsoft.com/servicebus/2016/07/20/service-bus-and-the-new-azure-portal/

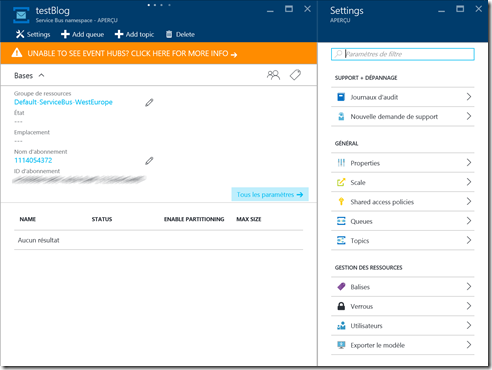
Cela va amener quelques changements, les informations de connexion vont donc être disponibles sur le nouveau portail

image

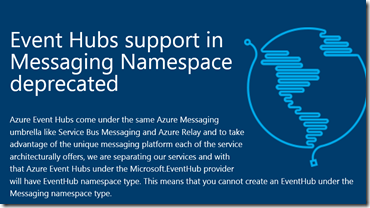
Egalement, pour les prochains services bus & event hub qui seront crée un namespace sera crée pour chacun (donc une connexion string différente). Pour les services bus existants, les services seront toujours liés, ce qui fait que l’eventhub ne sera pas disponible sur le nouveau portail actuellement je pense (comme vu sur la screen).

image

Les IHM arriveront progressivement au mois d’aout(Service Bus déjà disponible, EventHub en cours) et seront en mode preview jusqu’a Octobre et l’interface de gestion des Relays sera alors disponible.

Une chose très intéressante, disponible depuis plusieurs mois mais pas très documenté est que le Service Bus est également une ressource Azure, il est donc possible de gérer les accès (RBAC) pour autoriser les utilisateurs à accéder au Service Bus Namespace uniquement et permettre les associations à un Groupe de Resource.

Le service bus est donc déployable via l’ARM et vous trouverez les exemples sur le github des templates Azure:

https://github.com/Azure/azure-quickstart-templates

Particulièrement les créations de service bus :

https://github.com/Azure/azure-quickstart-templates/tree/master/101-servicebus-create-namespace

et la création des eventhubs:

https://github.com/Azure/azure-quickstart-templates/tree/master/201-servicebus-create-eventhub-and-consumergroup

Les templates permettent de récupérer les chaines de connexion en paramètre de sortie (utile avant que l’interface fasse son apparition dans le nouveau portail)

Posted in Azure, Français | Tagged , , | Leave a comment

Deploy Kong Api Management using Azure Resource Manager


I’m currently searching for a Api Management Solution & I’ve found Kong. Kong is built on top of reliable technologies like NGINX and Apache Cassandra, and provides you with an easy to use RESTful API to operate and configure the system. It was developed by The Mashape Team and used internally. Then they decided to propose this solution on GitHub as an Open-Source Api Management.

Kong is scalable, modular (with plugin development) and can run on any infrastructure.

At this time the Azure Deployment was not provided so I decided to create a Azure Resource Template to deploy an Test Environment of Kong with one Linux Ubuntu Server and a local installation of Kong & Cassandra on this server. (A standard A2 virtual Machine, 2 core, 3,5 Go RAM)

The Azure Resource Manager provide a way to deploy, manage and monitor Azure Resource in a Logical Resource Group. You can use template to deploy a large number of assets using the ARM. (more info on the Microsoft Azure Web Site)

Ready !

Starting the Environment

be sure you’ve an azure subscription before continue, you can try for free. And the Windows Azure Powershell  with Azure Resource Manager Commandlets.

Then clone the following Git Hub Repository :

$ git clone https://github.com/jdevillard/kong-azure

In this repository, you will have :

  • azuredeploy.json : the azure template file
  • azuredeploy.parameters.json : the azure template parameter file in which we’ll put value regarding our environment
  • kongscript.sh : this script will install the necessary software arount kong (JAVA, Cassandra etc…)
  • deploy.ps1 : powershell script to deploy the azure template.

With all of this, you need to customize :

  • azuredeploy.parameters.json with :
    • an Azure Storage Account
    • a Admin User Name (used to ssh to the Linux)
    • an SSH Key : you can follow this tutorial if necessary
    • dns Name for the public Ip to reach the Kong Gateway
    • the os of ubuntu (don’t change for latest version supported in azure)
    • the location of the Virtual Machine
    • the name of the Network Security Group (don’t change if you don’t know what it is)


  • deploy.ps1  with :
    • $resourceGroupName : the name of the new resource group where you want to create the Kong Virtual Machine
    • $subscriptionId : the id of your Azure Subscription to deploy the resource group.


Then you can place your prompt in the script directory and execute the deploy.ps1 script.

The script will ask you your Microsoft Account that allow you to access to your Azure Subscription.

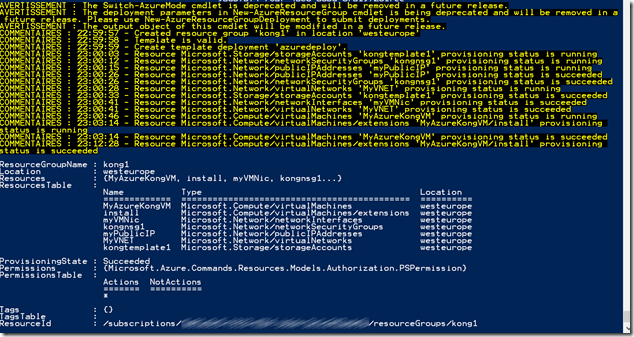
After few minutes, you will have all you assets deployed in a single virtual machine on Microsoft Azure.

image


This template deploy :

  • a new Storage Account
  • an Azure Virtual Network
  • a Network Security Group in this network
  • a virtual machine
  • a network interface to allow communication between the virtual machine inside the network and internet
  • a public IP with an DNS
  • The port 8000 (for proxy) and 8001 (for admin) are opened in the VNET (and also the 22 for the SSH).

    Once it is deploy, you can test using Fiddler or Curl with the following url :

    curl GET http://<DNS>.<Location>.cloudpapp.azure.com:8001

    for me (with default value) :

    curl GET http://kongtemplate1.westeurope.cloudapp.azure.com:8001

    you will have the default response with the plugin available on the Gateway :


    This Virtual Machine is good to test the Kong Gateway on a single instance.

    I will see in the futur if I can deploy a cluster of Kong with Cassandra cluster for the configuration repository.

    Hope This Help!

    Posted in Azure, English, Microsoft | Tagged , , | 3 Comments

    WebCast Windows 10 IT Pro


    Le 13 octobre sera délivré en français un webcast live par 2 MVP, Nicolas Bonnet et Jean-Sébastien Duchêne.

    https://mvp.eventbuilder.com/event?eventid=c8r8x9

    Voici quelques infos sur le web cast :

    A propos

    Les équipes du programme MVP et Windows IT Pro sont heureuses de vous proposer un webcast live *gratuit*, faisant partie d’une initiative communautaire globale, afin de délivrer une première série de conseils à propos de Windows 10 Entreprise à destination des IT Pros. Ces webcasts sont délivrés par des MVP Microsoft issus des différents pays participants. Windows 10 IT Pro Readiness est une opportunité intéressante pour vous afin de découvrir les dernières fonctionnalités de Windows 10 Entreprise, et aussi pour entrer en contact avec les meilleurs experts MVP Windows.  

    N’hésitez pas à vous inscrire !

    Bon webcast

    Posted in Français, Microsoft | Tagged , , | Leave a comment